Tips on Building a Playhouse
Building a Backyard Playhouse for the Grandkids
A few years ago, we decided to build a backyard playhouse for our grandchildren. At the time, we only had two, but we knew a third wasn’t far behind! Like most grandparents, we absolutely doted on them (and still do! 😊). Creating a special space just for them was such a fun and rewarding project, and over the years, it has been filled with laughter, imagination, and lots of happy memories.dchildren and still do))
Tips on Building a Playhouse
This isn’t a step-by-step tutorial on how to build a playhouse, but more of a look at how we approached ours—what worked, what we considered, and what we might have done differently.
The Plan
There was no official blueprint—just a picture from a Sunset book (I think it was Sheds and Garages). I originally imagined a sweet little gingerbread-style playhouse, something adorable and storybook-like. But then practicality kicked in. The grandkids would grow up, and we’d be left with a bright pink or yellow playhouse in the yard!
So instead, we designed something that could double as a potting shed down the road—neutral, simple, and versatile. Funny enough, we never actually converted it into a potting shed, but hey, we could have! 😊
Family Affair
Have you ever heard of a “barn-raising?” Back in the day, neighbors would come together to help build a barn for someone in their community. Well, that’s kind of what we did—except instead of neighbors, it was all family, and instead of a barn, it was a playhouse!
Our folks were kind enough to devote a Saturday to helping us bring this little project to life. With plenty of hands pitching in, we had four generations working together—making memories as we built something special for the grandkids. It was truly a family affair! 😊

They were all kind enough to work all day on this project with just the promise of sausage and biscuits in the morning, sandwiches for lunch, and steaks for supper! The job was completed from start to finish in one day!
Picking the Perfect Spot
We chose the most level spot we could find in the backyard, setting the playhouse a good distance from the house. At the time, we lived on ten acres, most of it wooded, so we thought it would be nice to tuck the playhouse at the edge of the trees—just out of sight a bit, making it feel like a little hideaway.
Our house had a wide back porch, then a swimming pool and pool house, and even a fort-style swing set, so we placed the playhouse behind all of that. It seemed like the perfect spot!
In hindsight… I didn’t realize that the grandkids weren’t going to spend much time in the playhouse unless I was out there with them! Turns out, it was a little too far from the house for their comfort. Lesson learned! 😊
But once the spot was set, my husband smoothed the ground with the tractor blade, and just like that—the building began! 🚜🔨
A Solid Foundation
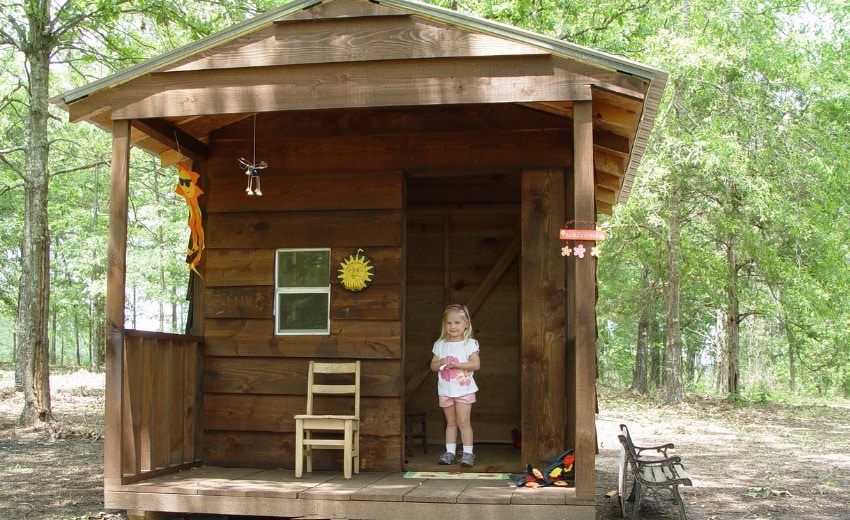
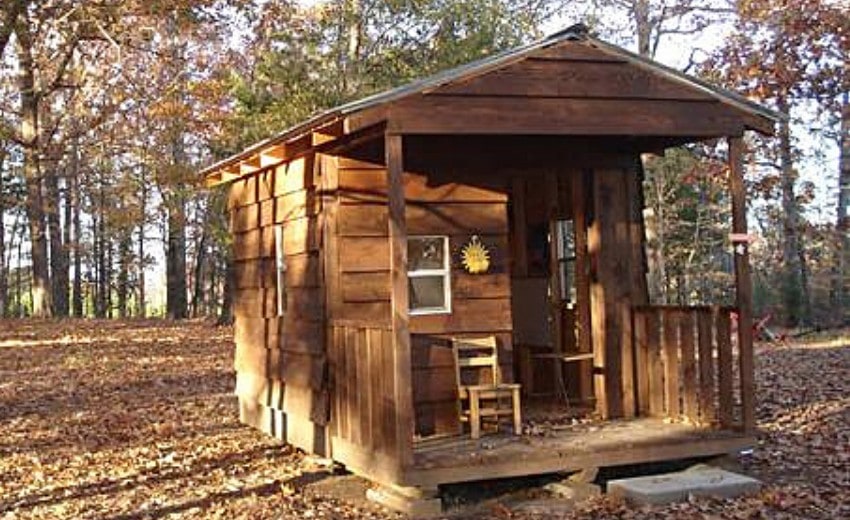
The playhouse was built on wooden skids made of treated lumber, sitting on concrete blocks to keep it off the ground. If I remember right, the whole structure measured about 8′ x 12′, with the actual playhouse being 8′ x 9′ and a 3-foot front porch—just enough space for some tiny rocking chairs and plenty of playtime fun.
Of course, this was back in 2006, so my memory might be a little foggy! But one thing I do remember for sure—it was built to last! 😊

Built to Move
Since the playhouse was built on skids, we always knew we could move it if needed. We never did relocate it in the backyard, even though having it a little closer to the house would have been more convenient. But when we sold our place a few years ago, the playhouse got a new home!
We sold it to a neighbor, who hitched up a big tractor, pulled it down the entire length of our driveway, loaded it onto a trailer, and hauled it home. And let me tell you—it held together just fine!
Floor and Rafters – A Playhouse with a Story
For the flooring, we used 1″ x 8″ lumber—though when I say we, you know I mostly mean the hardworking crew! 😉 What makes this playhouse even more special is that most of the wood came straight from our own land.
When Hurricane Katrina hit the Gulf Coast in 2005, we were 300 miles inland, but the high winds still took down a lot of our trees. To clean up, we had someone bring in a portable sawmill to cut the downed trees into usable lumber. That same wood was used to build the playhouse, along with some purchased materials for the rafters and 2x4s.
So in a way, this little playhouse is not just a fun spot for the grandkids—it’s also a piece of family history. ❤️
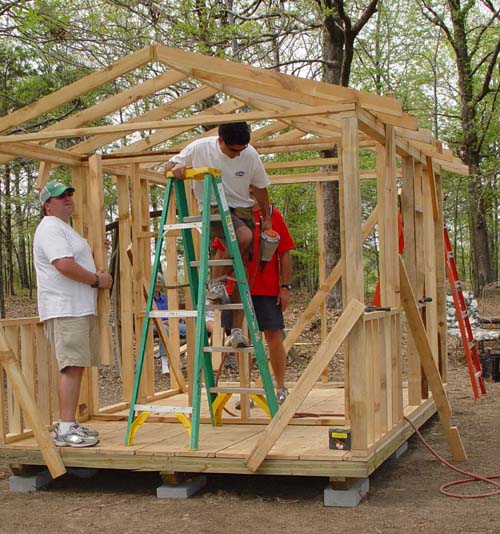
Our nephew premade the rafters and this speeded up the process tremendously for sure, along with his nailguns and some other equipment.
Framing the Sides
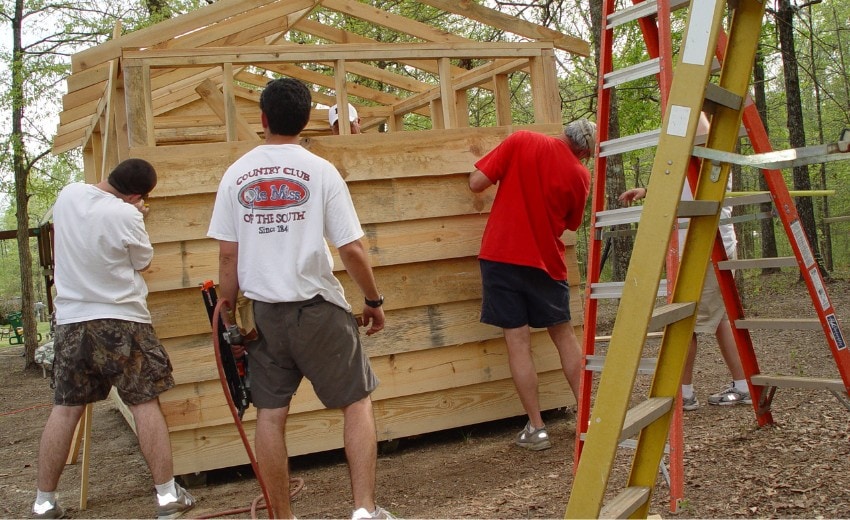
The playhouse sides were framed with 1″ x 8″ lumber in a lap fashion. This playhouse was heavy!
Windows, Roof, & Porch
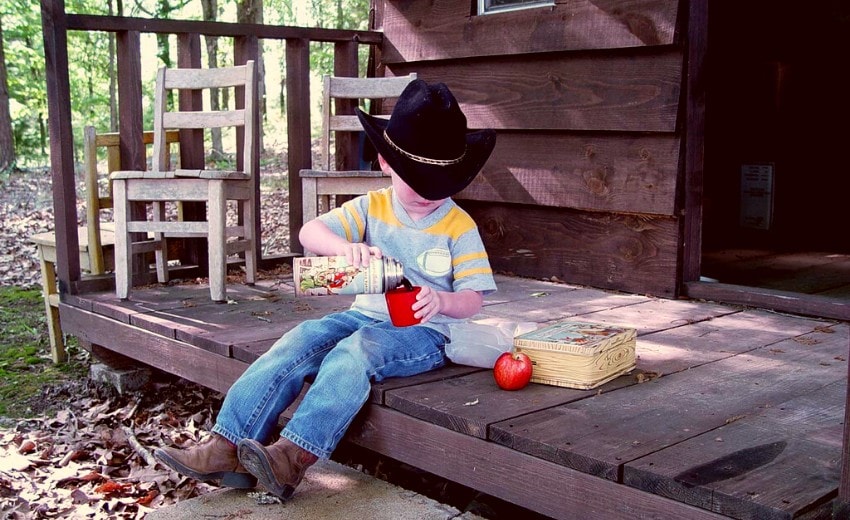
What’s a playhouse without windows? Of course, we had to have some! They installed three little sliding glass windows, and let me tell you—I quickly realized their true purpose.
I cannot even count how many times I had to “order” food through that front window! 🍔🍟 The grandkids absolutely loved playing restaurant, and I think half the fun was just being able to slide the window back and forth. It was the perfect height for little hands, and they never seemed to get tired of taking my order. So, if I wasn’t outside with them, I was definitely ordering from them! 😊
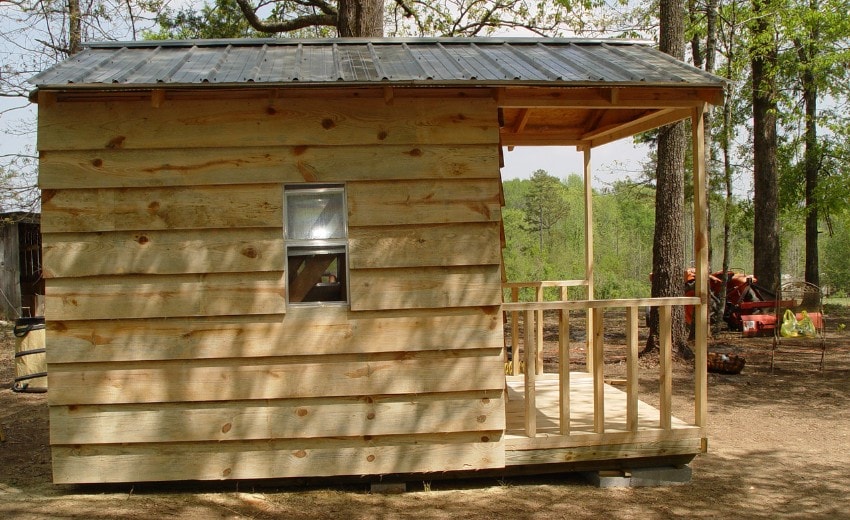
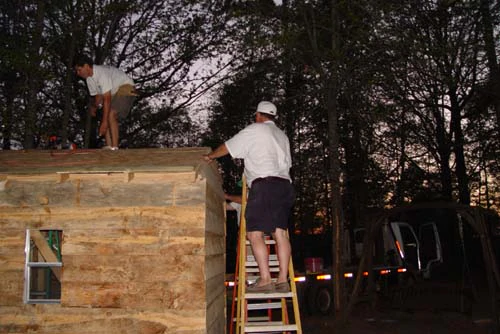
The playhouse got a metal roof, making it sturdy and weatherproof. And to complete the look, we added a 3-foot porch with a railing—the perfect spot for tiny rocking chairs and lots of imaginary play.
With that, it was finished! Well… almost. 😉 As with any project, there were always little details to tweak, but the grandkids were ready to move in, and that’s what really mattered!
Finishing Just in Time for Steaks
By dusk, the playhouse was almost done. The last task was securing the metal roof, and they had it finished just as the steaks were coming off the grill. A full day of hard work, and a great meal to wrap it up! 😊🔥
The Morning After – A Job Well Done
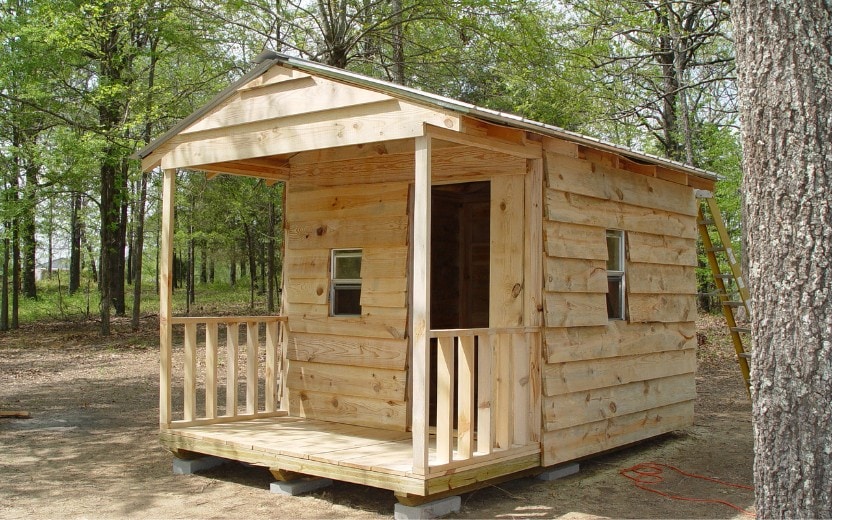
This photo was taken the next morning after everything was cleaned up and the tools were put away. I thought it looked great—just what I had imagined! Well, except for one thing… I had hoped to put a coat of stain on it. 😉
More than anything, this playhouse was a family project. Everyone pitched in—whether they were driving nails, carrying lumber, picking up scraps, helping with food, or just being the go-to “gofers.” It was a true team effort, and that made it even more special! ❤️

There was four-wheeling riding, gator driving, and swinging going on. It was quite a day!
My Role in the Playhouse Build
Mostly, I just walked around with the picture of what I wanted the playhouse to look like—and, of course, kept the food and drinks flowing! Water, lemonade, soft drinks… you name it. Keeping everyone fed and hydrated was my job, and I took it seriously. 😉
I don’t think the family has taken on another project quite like this since the playhouse raising, but I promise—if any of them call on me and my husband for help, we’ll be there. We may not be able to drive nails or carry lumber like we used to, but we can still bring food and offer our “expert” advice! 😂
I can still picture my dad now, walking around, studying every step as the guys raised the rafters. Everything, of course, met his approval and admiration. In his lifetime, he built the home I grew up in, barns, chicken houses, and even a cabin for my sister. I imagine it took a little patience for him to hold back his opinions during the playhouse build, but I’m pretty sure he had a recommendation or two that helped things along. 😊
The Final Touch
The last step for the playhouse was applying a protective stain. The pine lumber would have probably weathered to a nice gray over time, but we wanted to give it some extra protection.
This part was my job! Over a couple of evenings after work, I brushed on the stain—it didn’t take long and was pretty easy to do. I don’t remember exactly what I used, but I do know it was oil-based. And that was it! The one and only time the playhouse was ever painted. 😊
Built to Last
I have to say, the playhouse held up extremely well over the years. There were no leaks when it rained, and even though we left the doorway open on purpose, it stayed sturdy and strong. One of the windows did crack at some point, but overall, it remained intact and well-loved.
By the time we sold our place in 2018, the playhouse was 12 years old—and still standing just as solid as ever. It was the source of so much fun over the years and even made for some pretty great photo ops along the way! 😊📸
Little Details & Playhouse Memories
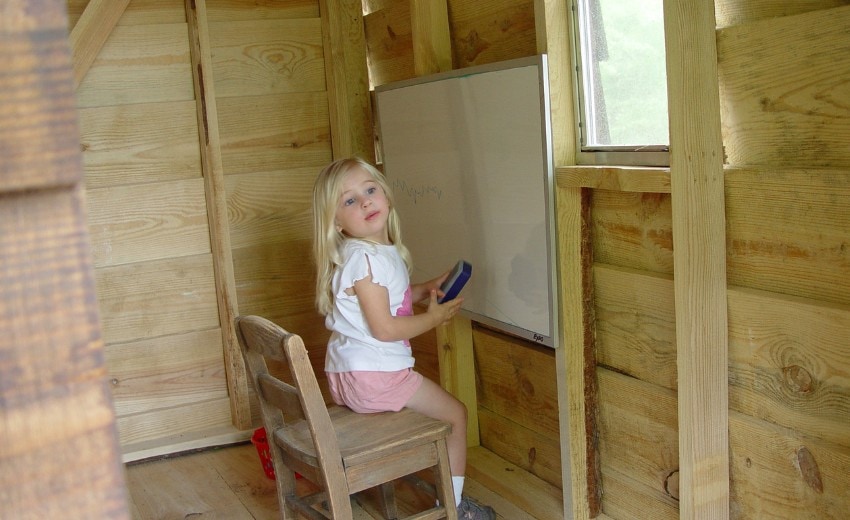
We attached a dry erase board to the 2x4s, giving the grandkids a spot to doodle and play school. The old oak chair that Maggie sat on had a story of its own—it came from the Hurricane School, which was destroyed by a tornado years ago.
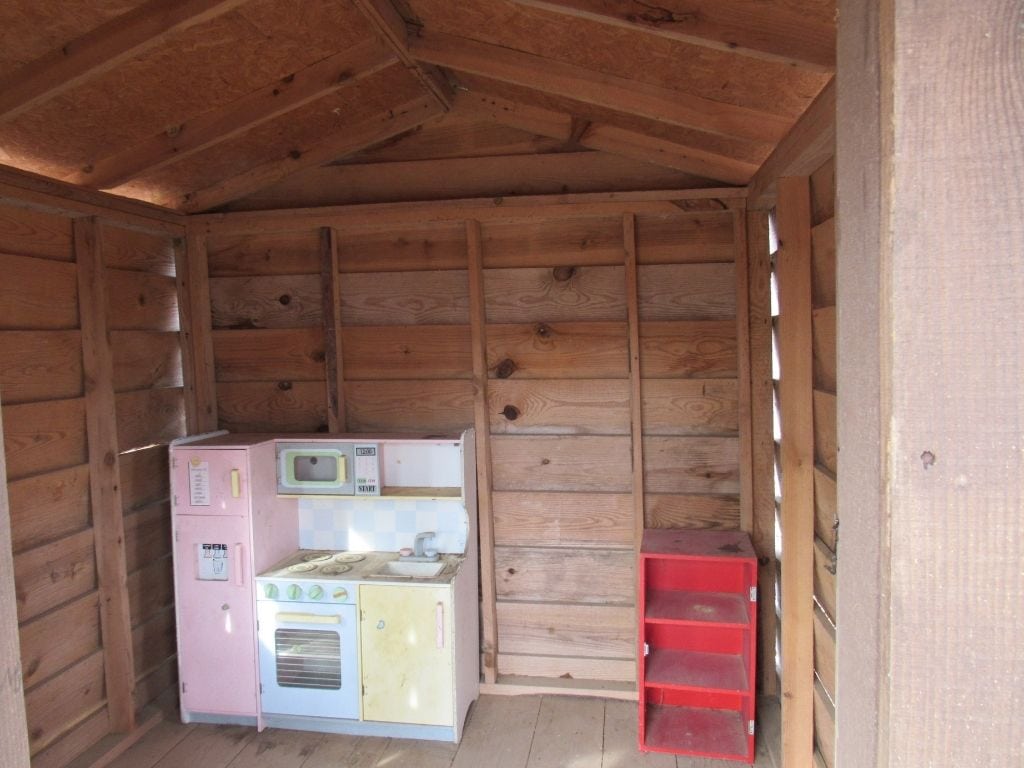
Inside, we added a few touches to make it feel like home—Maggie’s play kitchen, a cabinet, and some other little things. But we never left their “good” toys out there. If a critter ever decided to move in, we didn’t want them making themselves at home with the grandkids’ favorite things! 😊
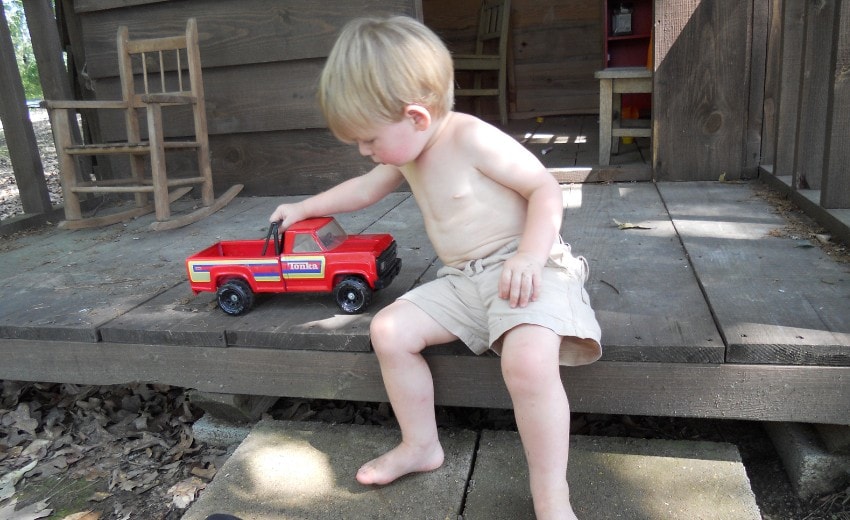
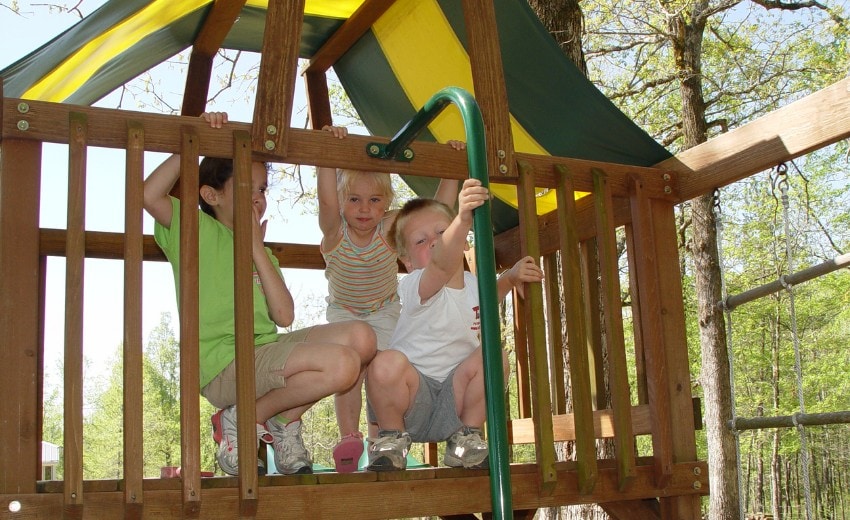
Our youngest grandchild, Matt, is just a few weeks away from turning 17, and looking back, he probably got the most use out of the playhouse.
He and I had more than a few lunches out there, just the two of us. 😊 It’s funny how something as simple as a little playhouse can hold so many sweet memories!
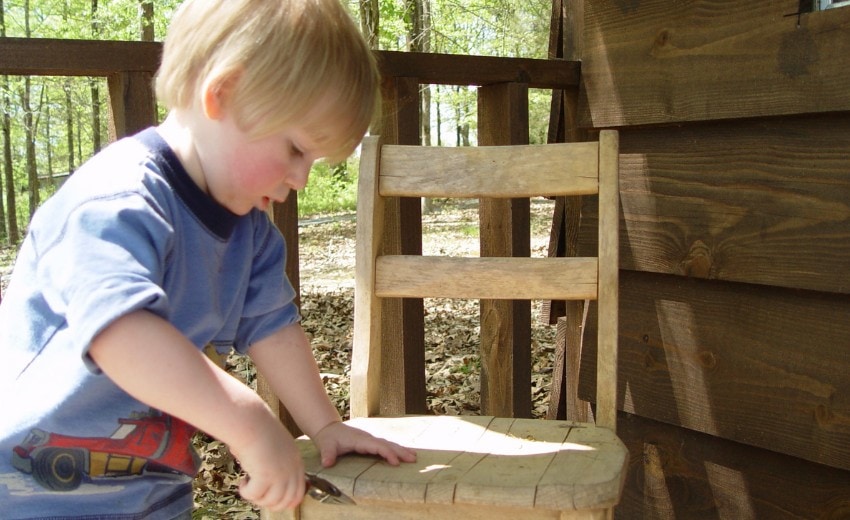
Matt always loved to “work” on things at the playhouse, fixing and tinkering like he had an important job to do. Even after the grandkids outgrew it, I still found a use for it—it made the perfect backdrop for photos every now and then. Some things may change, but the memories of that little playhouse will always stay. ❤️
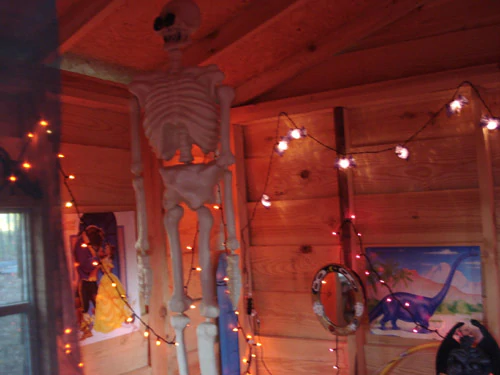
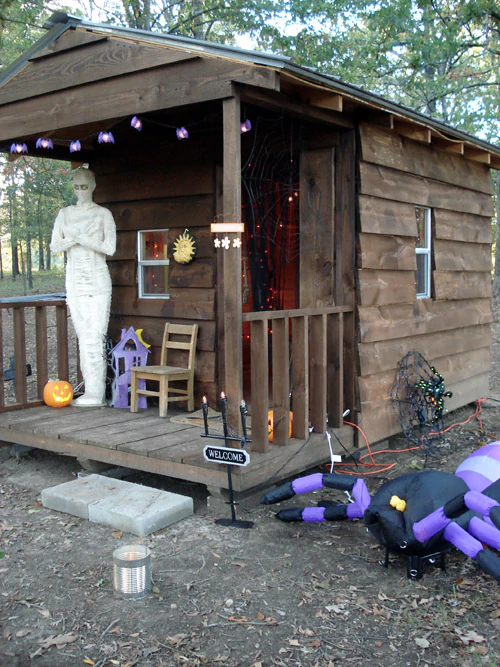
Over the years, the playhouse wasn’t just for everyday play—we even decorated it for Halloween and Christmas! One year, we turned it into a spooky house with skeletons and spiders, making it the perfect little haunted hideout.
But the best year? That had to be when my sister dressed up as a gypsy fortune teller and set up shop inside. There was a steady stream of kids coming and going all night, eager to have their fortunes told. The playhouse may have been built for the grandkids, but it sure brought fun for all of us! 😊🎃🎄
Summing it Up
I have plenty more photos of the backyard playhouse, but I’ve probably already shared more than you bargained for! 😊 Looking back, it was such a fun and meaningful project—one that brought years of joy, creativity, and even a few spooky Halloween nights.
If you’re thinking about building an outdoor playhouse for your kids or grandkids, here are a few tips to keep in mind! ⬇️
Tips
- Think long about the placement of the playhouse in the yard. The kids would have used it even more if it had been closer to the house. And I might have turned it into that potting shed had it not been so far from the house.
- Check about building codes. We lived out in the country, so there were no restrictions
- How long do you plan to use it? Convert it later into a storage shed or something similar?
- Consider termite management.
- Shop for a plan. There are so many free plans available!
- Consider adding electricity. We didn’t have any, but on occasion ran a long outdoor extension cord to the playhouse.
- LED battery light switches would be perfect.I didn’t know about them in 2006.
- Keep a can of wasp spray handy. I cannot stand wasps! And I’m a fanatic about it when it comes to the kids. We never let them set foot in the playhouse without one of us going in first and checking for wasps. We never had to run any critters out, but it’s really surprising that we didn’t!
- If you build it yourself, do what we did and make it a family or family and friends affair. Creating memories is what it’s all about))) And have food, lots of food.
- Put a lot of thought into the size. We made our playhouse tall enough that my husband could stand up straight and he’s 6′ 3″
Cherishing the Memories
If you have grandchildren, I hope you get to spend as much time with them as we did while they were growing up. I don’t know how much they’ll remember about all the little things we did for them and with them—but for now, we remember. And that’s a lifetime of wonderful memories to hold onto. ❤️😊
Jeannie, your Tips on Building a Playhouse post are just awesome! Your writing is always so good…so much so, that I feel I can see and experience what you are writing about! That playhouse is amazing! I know your grandchildren are grown, but how blessed they are to have grandparents like you, and your husband, that care so much about them…then, and now! Have a great day!
Thank you so much for the kind words Bonnie, I appreciate your taking the time to visit my blog))) I have hopes that someday maybe they will read some of my posts))) But, it’s okay. Love for our children and grandchilden is unconditional isn’t it)))
Sweet memories. As the grandchildren grow and get busy with sports, it is nice to remember the play days, sleep overs and making cookies. I cherish those memories with my grandson. Thank you for sharing this story.
It’s amazing how quickly the time passes isn’t it. I’m missing those days)))
Thank you Ruth for visiting my blog, I appreciate it so much. We should all write a book about our grandchildren)))