Why I Fell for Cheesy Grits: A Shout‑Out to a Favorite Recipe

Discovering a New Favorite
A few days ago, I was on the hunt for a great cheesy grits recipe and ended up on the Plain Chicken blog. I’d visited the site before, but this time I took a little longer to browse—and I’m so glad I did.
The recipe that caught my eye was called Mississippi Sin Grits Casserole, and it sounded like just what I was craving. I didn’t hesitate to try it!
You can find the full recipe over on the Plain Chicken website, so I won’t reprint it here. I ended up making only half the recipe, which was still plenty for the two of us. The full version serves 12—way more than we needed—but even as a halved version, we had delicious leftovers for a couple of nights. And that’s saying something—we’re not usually fans of leftovers, but this dish was an exception!

Adjustments I Made
Aside from halving the recipe, the only change I made was adding a bit more liquid before pouring the mixture into the greased skillet. It seemed a little too thick, so I added a splash of buttermilk—because that’s what I had on hand.
You could easily use a bit more chicken broth instead, depending on what’s in your fridge. My mixture might have thickened too much because I overcooked the grits slightly or mismeasured somewhere along the way. Either way, it just needed a little thinning to get the right consistency.
It turned out absolutely delicious, and there’s no doubt I’ll be making it again soon. Next time, I might skip the ham—especially if I’m serving it as a side dish rather than a main.
Funny enough, this morning I went back to the Plain Chicken site to double-check how many servings the full recipe made… and ended up getting sidetracked by more tasty finds! Don’t you just love exploring food blogs? 😊
2-Ingredient Cream Biscuits
These biscuits sounded way too easy—and too delicious—not to try! I had some heavy cream in the fridge for another recipe, but at 6:30 in the morning… biscuits definitely took priority.
You can find the full recipe on Plain Chicken (just click the header above to check it out). It’s as simple as it sounds—just two ingredients!
When I mixed them together, the dough felt a bit dry, so I added a little extra heavy cream until it came together nicely. Once the consistency was right, I rolled the dough out to about ½” thick.
And then I discovered I couldn’t find my biscuit cutter anywhere… which probably says a lot about how long it’s been since I last made homemade biscuits!
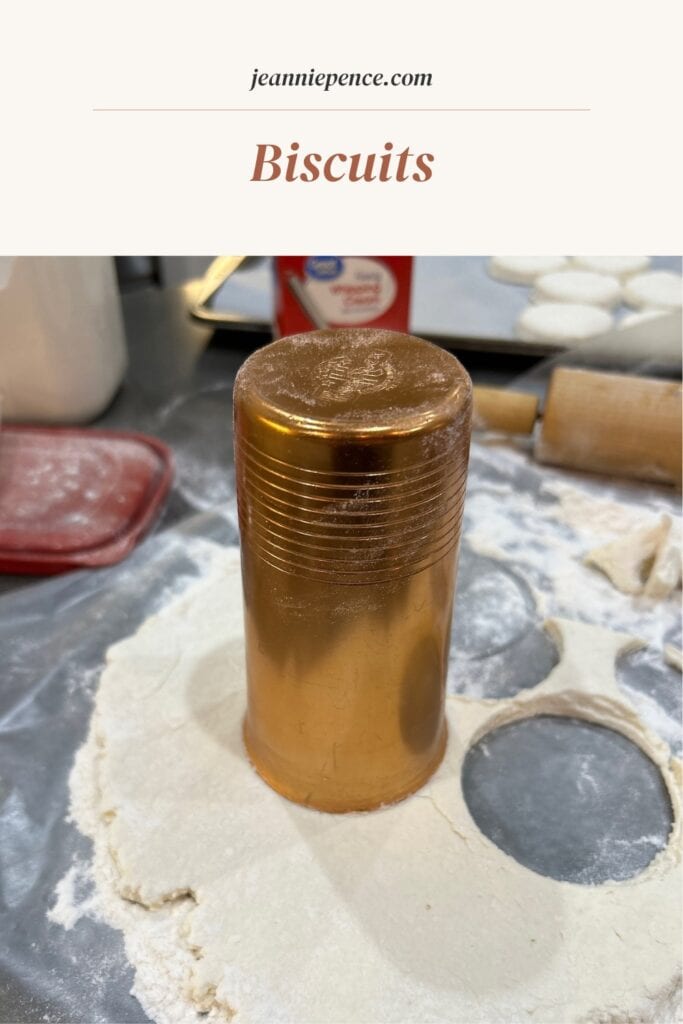
A Biscuit Cutter with a Story
Does anyone else remember those old metal drinking cups? This one’s a classic—shiny, vintage, and full of retro charm that brings back so many memories. These cups were everywhere back in the day, usually in colorful sets with shades like gold, red, and blue.
They were sturdy, kept your drinks cool, and were a staple in so many kitchens. Well, I found one tucked away in the back of a cabinet—and in a pinch, it made the perfect biscuit cutter!
A Biscuit Reality Check
Let’s be honest—frozen biscuits have spoiled us all! It’s just so easy to grab a couple from the freezer and pop them in the oven. I even use them in my chicken and dumplings these days!
I only wish we’d had them when we first got married—over 50 years ago. They would’ve saved me so many early morning biscuit-making sessions!
My Grandmother’s Biscuits
My first attempts at making biscuits were pretty pitiful—especially for a Southern girl who started learning to cook at around eight years old!
I had watched my mother and grandmother make biscuits countless times. My mother would usually roll hers out by hand, though she often used canned biscuits too.
Not my grandmother, though. She had a dedicated “dough bowl” in her cupboard, always filled with flour and covered with a dish towel. When she made biscuits, she’d mound up the flour—adding a bit more if needed—then create a well in the center for the Crisco and milk, either buttermilk or sweet milk. It was a beautiful, old-fashioned way of baking that I’ll never forget.
She would gently mix the shortening and milk, slowly pulling in a bit of flour at a time until it formed a smooth ball, all within the well she’d made. The flour around it stayed perfectly clean, with no stray bits of shortening—she was so precise!
She would pinch off pieces of dough, gently flatten them, place them on the pan, and bake. Biscuits were usually made for breakfast—unless, of course, you were having a supper of fried salmon, biscuits, and gravy.
Now, this wasn’t the kind of salmon you’d find in a restaurant. It was canned salmon, mixed with a few ingredients, shaped into patties, and fried up in a skillet. But that’s a story for another day… back to the biscuits!
Leftover Biscuits
My grandmother would place any leftover biscuits on top of the stove, covered with a dish towel—usually an old one made from feed sack or flour sack material. Her biscuits were almost as delicious cold as they were hot, and it wasn’t unusual to grab one during the day to eat plain or spread with a little jelly.
My mother, on the other hand, would split leftover biscuits open, add butter and a sprinkle of sugar, then toast them in the oven until they were lightly browned. They were such a treat!
My Biscuits
When we were first married, my leftover biscuits could have doubled as rocket launcher ammo! It honestly took me years to get the hang of biscuit-making. Then, when frozen biscuits came out, that was almost the end of my homemade attempts.
One key lesson I did learn, though, was not to overwork the dough. Mix the ingredients just enough to bring it together, then dump it onto a floured surface. It’s okay if it’s still a bit sticky—just sprinkle on enough flour so you can roll it out without it sticking to the rolling pin. Roll lightly, cut, and place them in the pan! And only re-roll the scraps once for the best texture.

No, I never mastered the knack of my grandmother’s biscuit-making.
Plain Chicken
My biscuits turned out a bit thinner than the ones on Plain Chicken, but they were so tender! We loved them. I don’t mind a thin biscuit at all! Sometimes I’ll scoop out the middle when biscuits are too fat.
I had added a bit of extra cream to my mixture, which might have made a difference, or maybe I rolled them slightly thinner than 1/2 inch. Either way, we loved how they turned out!
The Plain Chicken recipe said to bake at 500° My oven only goes to 480° and I thought that would still be too hot. But I set the timer for ten minutes, just like the recipe called for, and presto…..they were done!
Be sure to check out Plain Chicken. It’s a great food blog with simple down-to-earth recipes. I know I’ll be going back for more!