A Thrill of Hope: Creating a Christmas Wreath with Heartfelt Meaning

Thrill of Hope Wreath
Carrie and Taalor created a Christmas wreath with a sign that says “A thrill of hope, the weary world rejoices.” which adds a special touch to your holiday decor. The cream and navy Deco mesh, ribbons, and bow make it festive and inviting.
The message from the carol “O Holy Night” reminds us of the hope and joy Christmas brings, especially in tough times. This wreath not only looks beautiful but also shares a message of hope and joy with everyone who sees it.
You can make a Thrill of Hope wreath just like this for your front door with the wreath kit that Trendy Tree put together. For a list of the individual supplies with my affiliate links, visit the Trendy Tree Blog.
Watch the replay of the Facebook live they did a few days ago to see how the tutorial.
Navy and Gold Holiday Decor
Navy and gold for Christmas decorations brings a touch of elegance and sophistication to the holiday season. The deep navy color feels calm and serene, while the gold adds warmth and sparkle. Together, they create a stunning contrast that is both modern and timeless. You can use these colors in ornaments, ribbons, table settings, and wreaths. This combination complements traditional Christmas elements like greenery and candles, making your home look stylish and festive.
Using navy and gold for Christmas decorations also has special religious meanings. Navy represents the night sky when Jesus was born, symbolizing peace. Gold represents the gifts from the Wise Men. Together, these colors create a beautiful and meaningful atmosphere, highlighting the spiritual essence of Christmas. The Thrill of Hope wreath is a good example of incorporating navy and gold with a theme of faith.
Join my mailing list and get 20% off your next order at Trendy Tree!
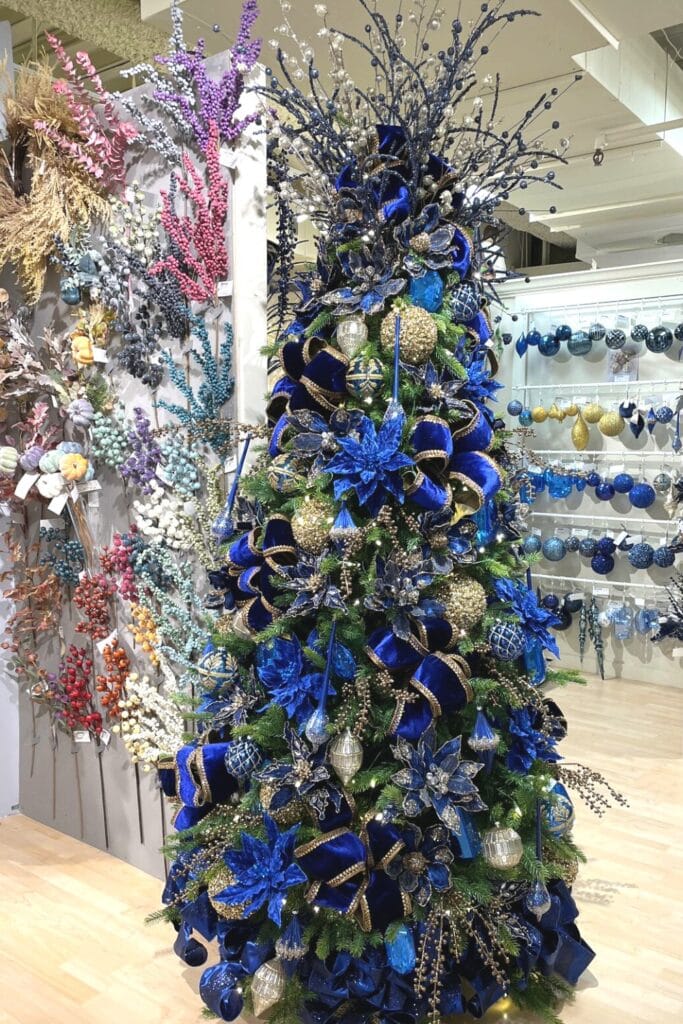
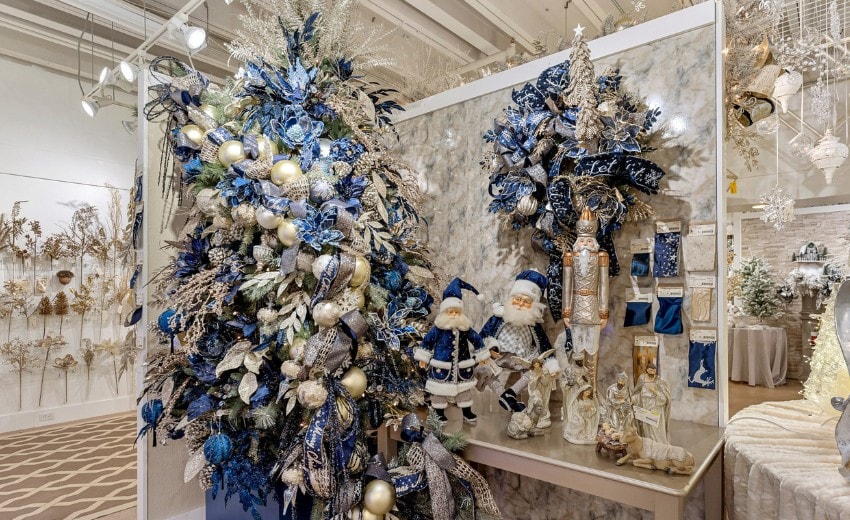
Christmas Trees
Have you browsed my section on Christmas trees? There are several with a blue theme. There are many more to see! Below are a couple from the Christmas Tree: Elegant section.
Today’s Navy Trend
When we go to the Dallas and Atlanta markets, we get so many ideas for decorations and home decor.

With navy being so popular right now, Carrie added a navy accent wall to her living area and hung wooden curio cabinets. This was an inspiration from RAZ and I think David, our son-in-law, did a great job))) Don’t you?
The curio cabinets came from RAZ also.
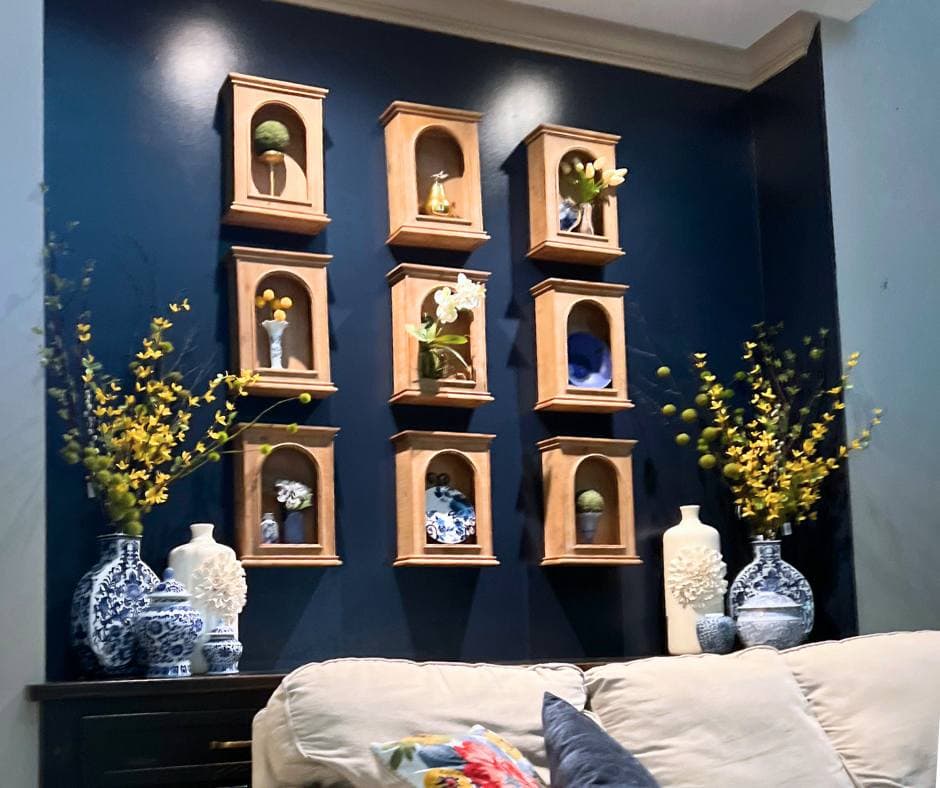
Using a trendy color on an accent wall adds style without overwhelming the room. It lets you try bold colors while keeping the rest of the space neutral. An accent wall can highlight features and add depth. Painting an entire room in a trendy color makes a big statement but can feel too much or go out of style quickly. Accent walls are a flexible and easy way to stay current with color trends and update your room’s look.
I have a feeling I’ll see the Thrill of Hope wreath hanging on Carrie’s front door this holiday season. I wouldn’t be surprised either if her Christmas tree and holiday decor feature a navy and gold theme as well))

Basic Deco Mesh Wreath with Ruffles/Curls
Equipment
- 1 Rotary Cutter Makes cutting mesh quicker and simpler.
- 1 Bow Maker Optional): Bows can be free-handed or made with an EZ Bowmaker.
- 1 Scissors Essential for various cutting tasks.
- 1 Metal Punch (Optional): Used to punch small holes in metal signs.
- 1 Heavy Duty Stapler Attaches chenille stems to wooden or MDF signs
- 2-4 Cable Mounts (Optional): Used to attach chenille stems to signs.
- 1 Cutting Mat Protects the table surface from the cutter and includes measurements for accuracy.
Supplies
- 1 wreath 24" Pencil or Work Wreath Each 24" wreath has 18 twist ties
- 2 rolls Mesh Mesh can be 10" 10.25" or 10.5" in width; 10 yards in length
- 4 rolls Ribbon Usually includes 2 rolls of 2.5" width and 2 rolls of 1.5" width, but variations are possible.
- 1 Sign Signs can be metal, wood, or MDF; and available in round, square, rectangular, or other shapes.
- 2-4 Chenille Stems Used for attaching the sign and making a wreath hanger.
Instructions
Cut the Mesh
- Use a rotary cutter to cut the mesh into 20" lengths.You will need to use all of both rolls.If the last piece is a bit short, don't worry—it won't be noticeable.
Preparing Wreath
- Spread and straighten the twist ties on the wreath form. If any tie comes off, simply reattach it by twisting it around the metal wreath form.Create a hanger now or after finishing the wreath using a couple of chenille stems, floral wire, or zip ties.
Creating Ruffles or Curls
- For a ruffle by rolllingl up the cut edges slightly, then scrunch through the middle to create a "bow tie" shape.Attach two ruffles to each twist tie. If you plan to add ribbon strips later, twist the ties only a couple of times.Form a curl by rolling up the piece of mesh starting from the cut end until it is about the size of a paper towel roll core.Pinch the curl in the center and secure two curls into each twist tie.Begin on either the outside or inner ring of the wreath, depending on what is most comfortable for you.
Ribbon Strips
- Cut ribbon strips 12-13" in length. Add a cluster of 4 ribbon strips to each twist tie. If you prefer less, or no ribbon at all, that works too—a mesh wreath can look beautiful even without ribbon strips.Four-ribbon cluster: Start with a 2.5" ribbon, layer a 1.5", another 2.5" and finish with a 1.5" on top. Pinch the cluster in the center and secure it in a twist tie. Undo the twist, place the ribbon cluster, then re-twist securely. Spread the ribbons out for visibility and run your fingers under them to give a slight curl.If you have limited ribbon and are working with scraps, omit ribbon where the sign or bow will cover it.
Attach the Sign
- Choose where you want to place your sign on the wreath.Metal Signs: You may need to punch small holes in the sides or top to attach the chenille stems.Depending on the depth of your wreath, use extra-long chenille stems or twist two regular ones together.Wood or MDF Signs: Use a heavy-duty stapler to attach chenille stems. To prevent the staples from going all the way through, place a small piece of folded cardboard under the chenille stem before stapling.Optional: Purchase adhesive cable mounts that stick to the back of signs. Secure them with permanent glue. Thread the chenille stems through the cable mounts.Use the chenille stems to attach the sign to the wreath form. Make it snug enough to prevent slipping but not so tight that it squashes the mesh and ribbons.
Wreath Bow
- Create a wreath bow measuring 12-14 inches. You can do this free-hand or use a bow maker.Decide on the length of the tails before you start. Consider if you want one bow or multiple bows for your wreath.Often, one bow is used, and its placement depends on the sign's position.You may choose to use multiple bows and omit ribbon strips entirely. Finish the ribbon tails with a dove-tail or angled cut. If the ribbon has an attractive back side, you can roll up the ends slightly to show it off.Fluff your bow and run your fingers under the tails to give them a gentle curl.
Finishing Touches
- Fluff your ribbons to ensure they look full and tidy.Snip any loose frays to keep the wreath neat.Inspect the back of the wreath for any sharp edges that might need to be smoothed out.Create a hanger using a couple of chenille stems, floral wire, or zip ties.