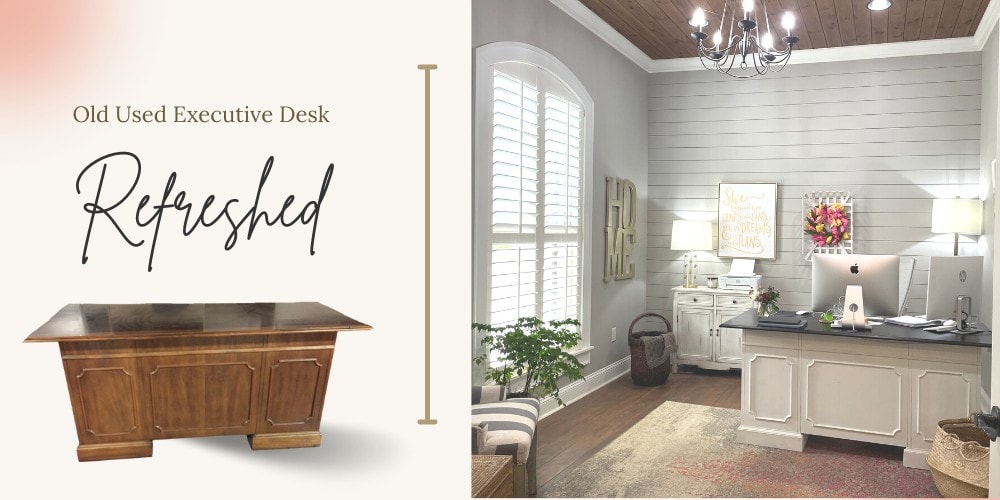
Home Office Desk Makeover: A Fresh Start with a Classic Desk
Spoiler Alert: This Isn’t a Furniture Painting Tutorial
What it is, though, is the story of how I gave a classic executive desk a fresh new look for my home office—and if I can do it, so can you!
Now, let me be clear: this isn’t a step-by-step tutorial on how to paint furniture. But after doing a good bit of shopping (and a little price shock), I decided a home office desk makeover was the better route than buying something brand new. It saved money, turned out beautifully, and gave an old desk a new life—and I’m so glad I did it.
Home Office Furniture: Out with the Old, In with the… Older (But Better!)
When we moved into our new house a few years ago, we turned one of the extra bedrooms into a home office for me. I spend a lot of time behind the keyboard for someone who’s technically retired! My workspace originally featured a big, heavy computer console desk in dark cherry—like nearly everything else in our previous home.
Don’t get me wrong, I loved that dark cherry furniture at the time. It was everywhere—bedrooms, living room, kitchen cabinets, even the floors. But after 15+ years, I was ready for something lighter, brighter, and a little less bulky.
Finding the Right Desk (Finally)
So, I started desk shopping. Most of the newer desks I liked were sleek writing desks—pretty, yes—but they lacked the functionality I wanted. Few had deep file drawers or useful storage. Some looked great but weren’t built for everyday use, and I wanted something for everyday use.
That’s when I shifted gears and started looking for a used desk—something with character and storage space. And wouldn’t you know, I found it! My sister-in-law Cheryl and her husband Ricky own the Office Furniture Warehouse in Tupelo, and it was the first (and only) place I needed to check.
Office Furniture Warehouse
The Office Furniture Warehouse has everything from used office furniture to high-quality pieces featuring the latest designs and trends. They can provide office furniture for any budget and they supply surrounding areas and states with their superb customer service with setup and delivery.
My budget for a home office desk was fairly small. I really didn’t want to spend more than $500 or so, especially for something old. I found exactly what I was looking for and had money to spare to pick up a new chair too!

Choosing the Right Colors
The desk itself was in great shape. All the hardware was intact, and aside from a few minor scratches, it was solid. The only issue? That deep cherry—or maybe it was mahogany—finish that just didn’t fit the lighter, brighter look I was going for.
I knew from the start that I wanted something in a soft, neutral tone—maybe off-white, light gray, or something close. But I’ll admit, my very first idea was bright coral! A friend of mine has a stunning royal blue writing desk, and it inspired me to think outside the box. Why not make a statement?
Well, thankfully I never did find that coral paint. 😉 By the time I got serious about choosing a color, I settled on a classic combo: a creamy vanilla shade for the base and an off-black for the top. In the end, neutral felt like the right choice—and very me.
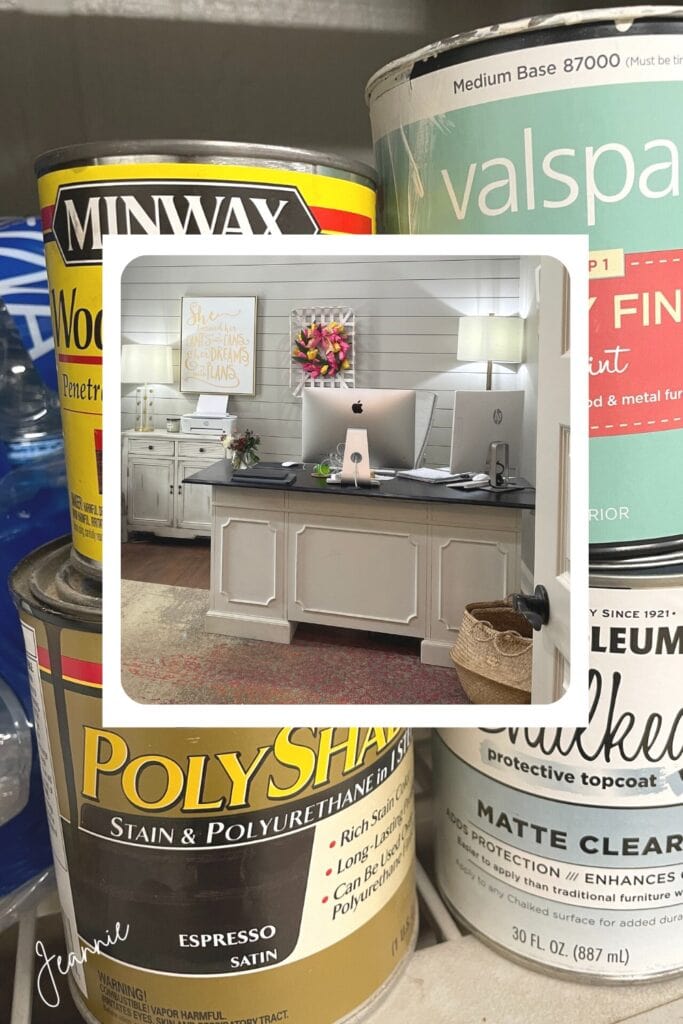
As I mentioned earlier, this isn’t a painting tutorial, so I won’t go into all the details about the paints, brushes, or tools I picked up. Just know they all came from familiar spots—Home Depot, Lowe’s, and our local hardware store, Moore’s. I chose what felt right, took my time, and the results were well worth the effort.
Before my desk was delivered, my nephew Derek—who also works at Office Furniture Warehouse—drilled a hole in the top so my computer cords could drop right through. (Such a simple touch, but it made a big difference in keeping things tidy!) My niece Michelle works there too, so yes—it’s a full family affair.
I love supporting small, family-run businesses, and this was a great reminder of why. Trendy Tree is one, and Office Furniture Warehouse is another. Between the two of us, we’ve got you covered for crafting supplies and office furniture!
Okay, Let’s Get to the Point… The Desk Makeover Steps!
Alright, I’ll stop rambling and get to the practical part of the makeover. Here’s what I did:
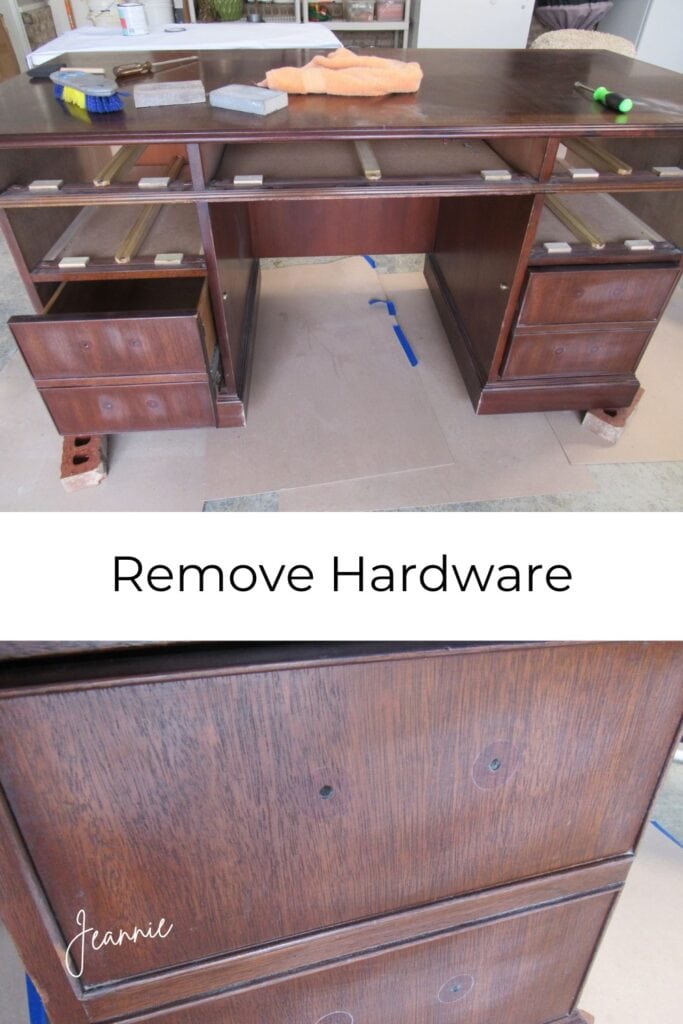
I had hoped to update the desk with trendy silver or pewter pulls, but nothing matched the original hole spacing—they were always off by just a little. Filling and redrilling was more than I wanted to tackle.
So, plan B: my husband spray-painted the original hardware flat black. It worked like a charm! The pulls looked fresh and modern, and they screwed right back into the old holes with no hassle.
Painting the Desk (Not the Top—Yet!)
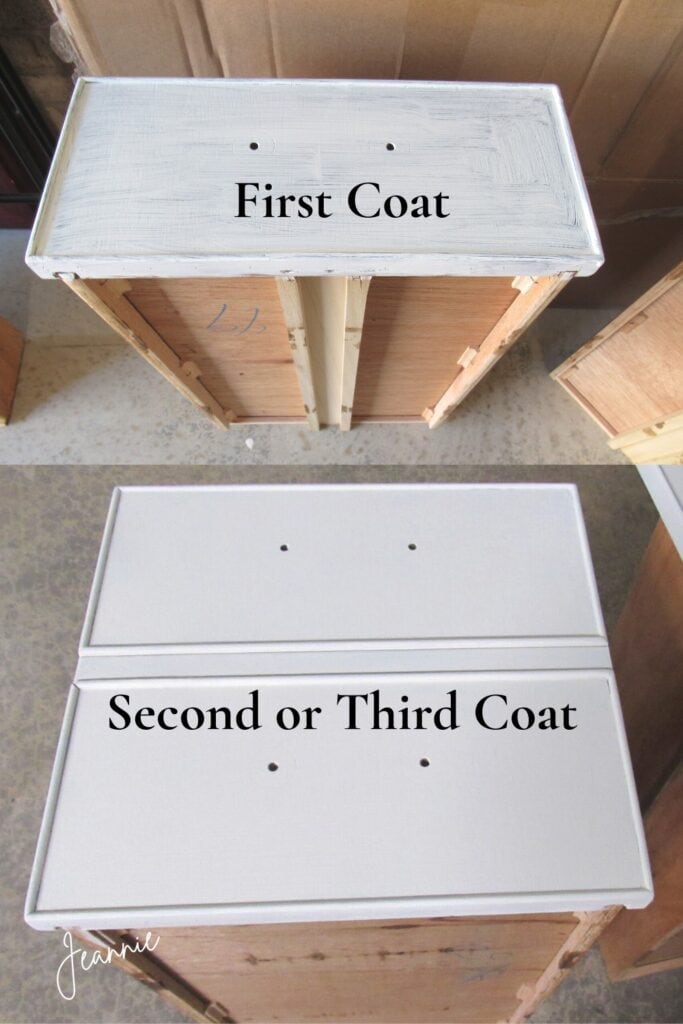
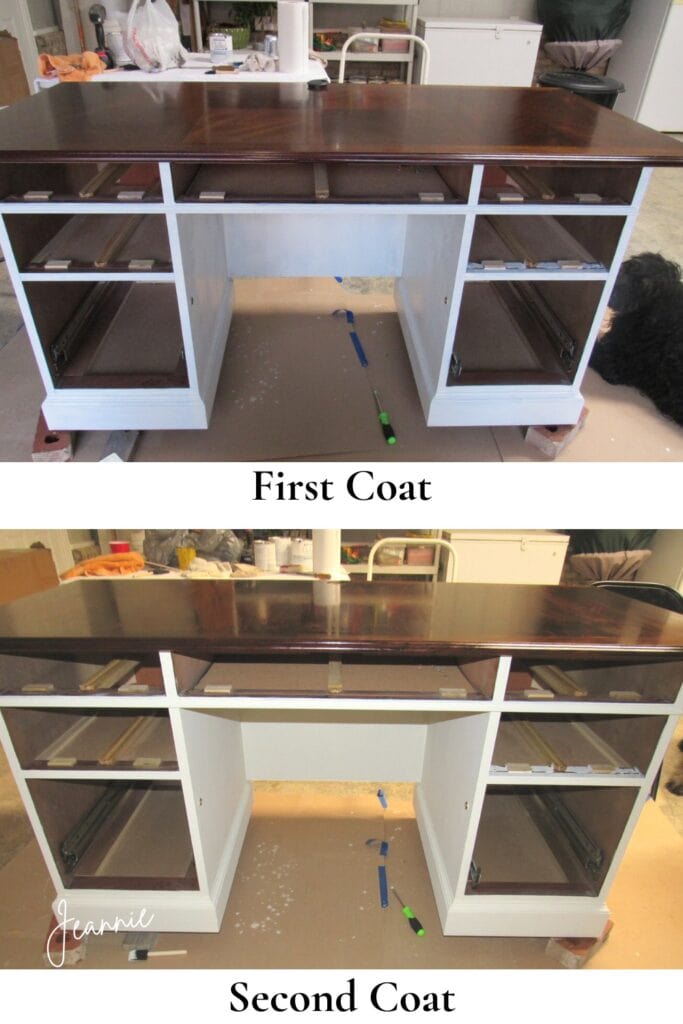
I began with the small drawers—they were the most manageable pieces to tackle first. Those got the first coat of paint. I worked my way around the rest of the desk, painting everything except the top, which I saved for later since it would be a different color.
When the first coat dried, I’ll admit—I panicked. It didn’t look great. But I didn’t give up. I was using chalk paint and allowed each coat to dry thoroughly overnight. The second coat made a big difference, and I added a third coat to the drawer fronts since they’ll take the most wear and tear.
To finish, I applied a matte clear coat to all the white-painted surfaces. Then I turned my attention to the top.
Finishing the Top: A Change in Plan
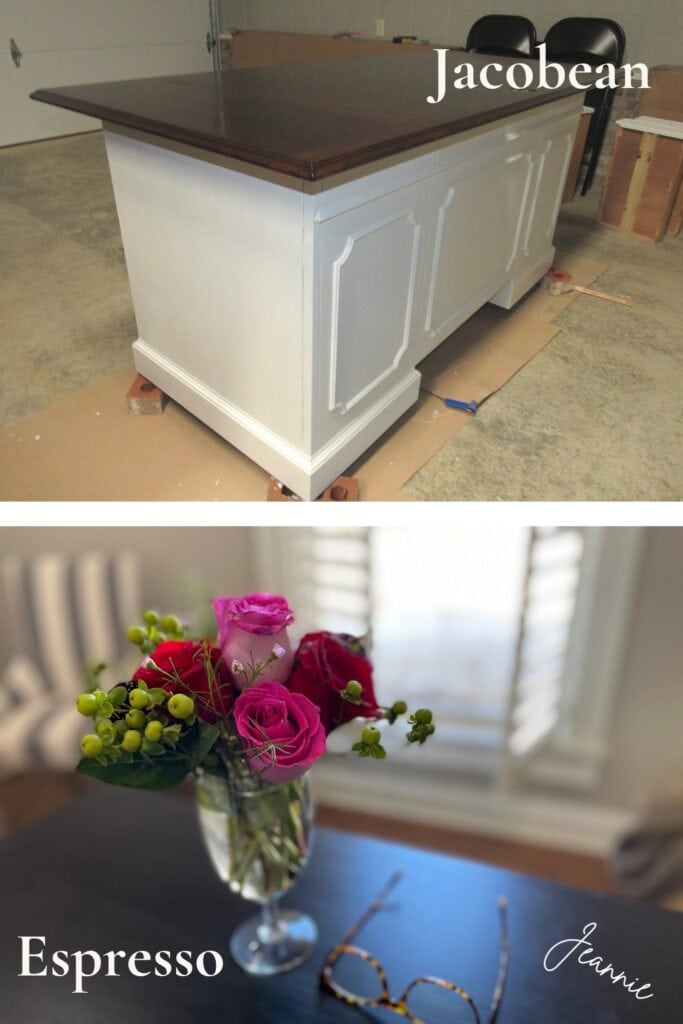
I originally chose a Jacobean stain for the desk top and applied two coats. While it went on smoothly, the grain from the original finish still showed through, and the color ended up looking too similar to the old cherry tone I was trying to move away from.
So, I changed course. I found an off-black Espresso satin finish at Moore’s Hardware in Pontotoc. It was a stain and polyurethane combo, which made things simple. After a couple of coats, the finish looked great—and I didn’t have to seal it with anything else.
All Finished – A Desk and a Space I Truly Lovel Finished
In the end, the whole project wasn’t nearly as difficult as I expected. Painting in the garage during winter wasn’t too bad—I’d pop out, put on a quick coat, and then come back the next day for the next layer. No rush, no stress.
The desk itself is heavy—definitely not something you want to move more than once. I even considered bringing it inside to paint in my office, but I was a little hesitant about the fumes. Chalk paint wouldn’t have been an issue, but I wasn’t sure about the topcoat and finish.
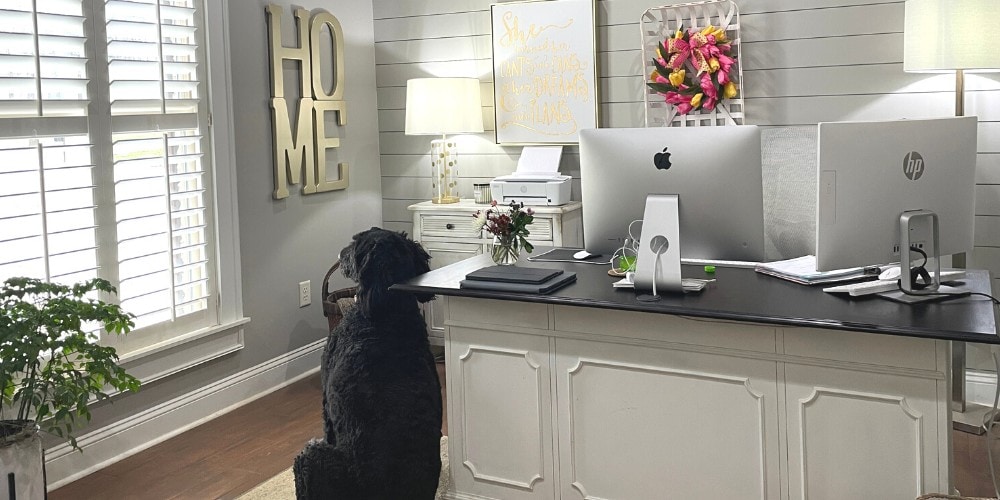
And of course, I had company throughout the process—my sweet dog Browser stayed close by during the entire makeover. As you can see, he’s made himself right at home in my office. 🐾
I spend most of my afternoons in this space, and it really does feel like going to work (in the best way). Even in retirement, I enjoy blogging, editing images and videos, and taking on creative projects. That said, I do make a point to shut the office door in the afternoon—and not go back in until morning. If I start something in the evening, I’ll stay up all night! Anyone else do that?
More to Come!
Before I wrap this up, I wanted to mention the raised trim detail on the front of the desk. While browsing desk makeover ideas, I saw where some people suggested removing those raised accents for a more updated look. I thought about it—but wasn’t quite brave enough to try. I wasn’t sure if they were glued on or nailed, and I didn’t want to risk damaging the wood.
Someone also recommended painting the trim in a darker color to make it pop, but for a beginner like me, I figured simpler was safer—and I’m happy with how it turned out.
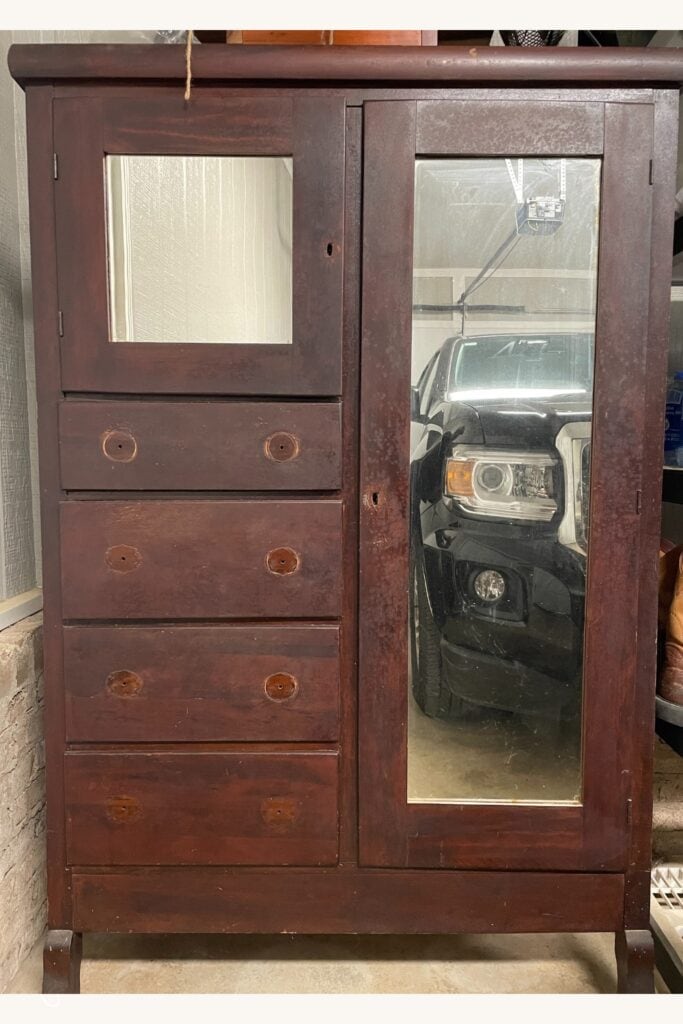
Since finishing this desk makeover, I’ve actually chalk-painted a lingerie chest and a nightstand too! I’ll be sharing those projects in a future post. And believe it or not, I’m almost ready to tackle my grandmother’s old chifferobe. It’s in great shape, and I’ve already removed the hardware. I think it could be perfect in my home office as a supply closet. Otherwise, it’s just sitting in the garage—and that’s a shame for a piece that’s probably close to 100 years old!
What do you think—should I go for it? I’d love to hear your thoughts, suggestions, or even your own makeover stories! Drop a comment below and let’s chat. 😊
You did a great job on the desk! I’m glad you left the wood detail on the front of the desk too – I think it looks perfect and gives the desk character!! Plus I too would have been afraid of trying to remove those pieces – glued or nailed. Keep up the good work! I’ll be looking forward to your work on the chifferobe.
Thonk you Joanie)) Sorry for the delay in responding, we’ve been out of town for a few days))) Thank you for following!
Hi Jeannie, Love the desk. You did a Wonderful job. I like the trim painted white, it just looks Right! I think you should paint the Chifferobe. It will be Gorgeous, and give you additional storage in your office. Every time you see it, you will think of your Grandmother!! Have a Fabulous Day! Ellen
Thank you Ellen))) I said all winter I was going to paint the chifferobe once the weather was permitting….well spring is here)))
Love your desk. Makes me want to go out and buy one to paint. I do have nightstands upstairs that I’ve bought at Estate sales. They need painting. So this encourages me to try my hand at it. The Chifferobe is beautiful. Go for it! With your talent and expertise it will be awesome.
Thank you Mona)) And thanks for visiting my blog)) Chalk paint really isn’t messy to work with. I’m thinking about going ahead and starting on the chifferobe soon))
Hey Jeanie,
Love your desk makeover article. So now, I’m thinking go for the chifferobe project. Reason being, I have an old chifferobe in need of a refurb and I’m sure you can give me some inspiration. Have a happy Easter and spring.
Rita
Thank you Rita! I may give it a whirl. I hate for it to just sit, unused. I can’t bear to get rid of it. I still have the to it that my grandmother used. It had a little scrap of cloth pinned to it and she kept it pinned right inside her dress….all the time)))
Happy Easter to you and your family too))
Yes…a light grey for the chifferobe would be a beautiful compliment to your black and white desk! Of course only my opinion!!
I sent comment yesterday at same time my internet stopped, so I think the comment did not send. Love your home office desk makeover, and your home office!! So neat you gave that desk a new life, just like you did the broken boxwood wreath:) To your posted question…yes, tackle the chifferobe, and give it a new life as well!! Like you need my permission! Ha!
Thank you Bonnie and I appreciate your comments!I’m debating on the color to do the chifferobe right now. I was thinking same as the desk, but that might be too much of the same, so. maybe a light grey….off black?