Pastel Deco Mesh Easter Wreath
Ready to have a Hoppy Easter? Me too! Making this pastel deco mesh Easter wreath with the cute snow globe-style sign put me in the mood for spring! Carrie and I did a Facebook/TikTok live the other day and put together this cute deco mesh wreath.
If you missed the live, you can catch the replay right here.
Watch the Replay
Supplies
All the supplies came from Trendy Tree of course, and I just checked. Everything is still in stock!
Trendy Tree Products for the Deco Mesh Easter Wreath
Handy Tools
Tips – Deco Mesh Easter Wreath
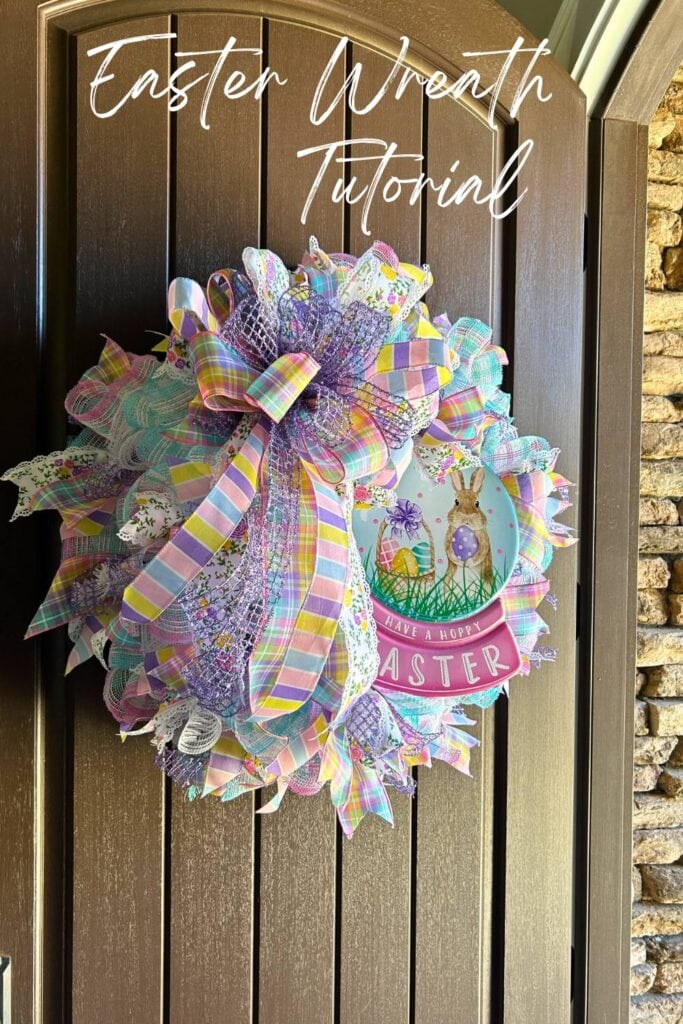
Mesh Ruffles
Cut the mesh into 20″ strips. It will take all of the two rolls for the deco mesh Easter wreath. There are ten yards of mesh on a roll, and 18 twists on the 24″ work wreath. So you should have enough ruffles to place two ruffles in each twist. Now sometimes a roll might be a little shorter than ten yards or a little longer. Having a ruffle that isn’t quite 20″ in length will never show.
But, if coming up short bothers you, you can always cut them 19″ in length to avoid this happening. This was a great suggestion from one of our viewers the other day.
Roll the cut edges of the deco mesh in a little bit, and then scrunch up through the middle and make a ruffle. It looks sort of like a bow tie. We chose to put the white mesh on the bottom and the patterned mesh on top. Secure the twist with a couple of turns.
Ribbons & Bows
You can opt to do ribbon strips or leave them off. You can make one large bow or two or three smaller ones. The options are so varied. We chose to do 12″ ribbon strips with all four styles of ribbon. We made of cluster of each one of the four styles and secured it in a twist. I like to open the twist, making sure the ruffles stay in place, lay down the cluster, and secure again with 2-3 twists. Spread the ribbons out so they are not lying on top of each other.
Make a bow either free-handed or use a bow maker. Sometimes I make three identical bows and leave off ribbon strips. And sometimes I do ribbon strips and one bow. If you are running short on ribbon, you can always add your bow first, then fill in with ribbon strips if you wish. Seems like we rarely use up all the ribbon on a wreath and have leftovers.
Have a Hoppy Easter Sign
Add the sign to the deco mesh Easter wreath by securing it with chenille stems. All signs are different, so you have to devise a way to attach them. You can buy cable mounting ties and secure them to the back of a metal sign with some extra glue and run your chenille stems through them. On an MDF sign, you can usually staple the chenille stems. Be careful that you don’t staple through the sign. You can prevent this by slipping a piece of cardboard or foam piece under the staple.
Hang the wreath up to get a visual of where you want to place the sign and bow(s). Once we had finished the deco mesh Easter wreath and I got it home to take photos, the bow was not quite in the right place. So that happens, just adjust things to position them to your liking.
